Wooden Pirate Ship Playhouse Plans - Review by DIY Father & Son Team

To err is human. To aaaarrrrgggghhhh! is pirate.
That’s what I always say. Maybe I say it too much because now, my son says the same thing all the time. I used to love playing pirate as a kid. My son must have gotten the bug from me.
We bond over all things pirate. Since we couldn’t very well get on a pirate ship, we went for the next best thing. We decided to buy a wooden pirate ship playhouse.
Now, have you tried shopping around for a wooden pirate ship playhouse? If you have, you must know that a well-built one can cost you anywhere between a couple thousand dollars to $5000!
We didn’t have that kind of money to blow on a playhouse! So we settled on building one instead. Surely it won’t cost an arm and a leg.
And if we’re going to do that, we needed some kick-ass wooden pirate ship playhouse plans.

Yup, we went online to look for the right plans and we found them! My son was awed by the wooden pirate ship playhouse on the cover. I was, however, skeptical. No way would we be able to do that! It’s BIG. It looks professional. And it looks complicated. So NO. We’re not doing that!
Of course, I should have known that when a kid has fixed his sights on something, it would take a lot to shake it loose. Needless to say, I spent a couple of weeks listening to my son pleading and begging and needling and whining until my wife just said, “You know what, just go and buy that thing already!”
So we did. I figured if things didn’t work out, we can always fall back on the advertised 60-day money back guarantee.
However, the wooden pirate ship playhouse plans package is awesome! And I have since regretted the fact that we didn’t get it sooner.
Here’s what’s included:
• 24-page blueprint set “instant digital download”
• Scale drawings
• Step-by-step photo illustrations
• Step-by-step video library
• Email and phone support
If you’re like me, you may want actual hard copies of the illustrations. Those are available for delivery via US mail. We made a project out of the whole thing. Initially, I was worried that it’d be hard to do anything.
I’m an accountant, for crying out loud. Although I dabbled in woodworking here and there, I would say my carpentry skills are really close to zero. But I’m happy to say that everything was written in a language that’s not too technical for a newbie like me. All the steps were properly explained.
Sometimes, there’s even too much explanation going on that you just want to say, “Okay, enough already. Let’s move on to step 2!” But that’s not a bad thing, really.
Whenever there was something that’s confusing for us, we contacted the customer service support. The guy who put together this package was very helpful and friendly.
But you know what the best thing about this is?
I got to interact with my son and share the experience of creating this masterpiece with him. He was there with me every step of the way. I think he appreciated that he got a say on every detail.

My son helping out with the construction process!
From the actual playhouse to build to what materials would work best. I think it was good practice for decision-making in later life (at least that’s what I told the wife!). I loved how we’d look at “our ship” every day and slowly see her coming together. There’s a sense of accomplishment that we both basked in.
We have finished the project, I’m happy to say. Our backyard now proudly hosts one wooden pirate ship playhouse made by dad and son. She’s a real beauty. And it was all possible with the right step-by-step instructional guide and plans along with a lot of hard work.
We have finished the project, I’m happy to say. Our backyard now proudly hosts one wooden pirate ship playhouse made by dad and son. She’s a real beauty. And it was all possible with the right step-by-step instructional guide and plans along with a lot of hard work.

Almost done!
So, head over to the image-button below to download a set of comprehensive plans for building an extremely cool pirate ship playhouse. Those plans may look complicated initially, but are actually pretty easy to follow.

Not Interested in These Pirate Ship Playhouse Plans?
Okay, perhaps you’re not really that interested in putting together a pirate ship playhouse. Maybe you want to construct a normal playhouse, or perhaps even two or even three different looking playhouses!
Well, if that is the case, then I just thought I would give you the heads up that somebody actually did create several different easy-to-follow, step-by-step, full color playhouse plans which are also downloadable.
It was only a matter of time that someone would get around to creating a bunch of really cool playhouse plans. I have to give credit to the creator of these playhouse plans, John White—who’s a real pro in the art of woodworking—for putting together these pretty awesome plans.
Update: Sorry, John White's plans are currently unavailable.

Basically, this website provides a playhouse quick start kit that gets you moving in the right direction. If you don’t know where to start or what to do then these playhouse plans kit will help for sure. I got the plans just recently and here are some of the cool stuff I found in the kit:
9 different playhouse plans to specifically meet your child’s requirement.
300+ pages of clearly illustrated step-by-step playhouse plans
Blueprints that are easy to read and in FULL COLOR
Playhouse Plans in PDF documents for you to download
Complete materials list so when you go shopping you will know what you need
In addition to all the great playhouse plans you get 2 terrific bonuses:
Bonus #1 - Woodworking 101
This is basically a woodworking guide for beginners. It’s packed with helpful content—covers lots of things from safety and various styles of saws, to chisel basics, hand tools selection, producing working drawings, and so much more. It’s a very decent bonus for those who are wet behind the ears when it comes to woodworking.
Bonus #2 – Premium Furniture Plans
Besides the 9 different playhouse plans, you get 5 premium furniture plans which are also in full color and the instructions are not hard to follow.
This playhouse plans kit is sold at a very affordable price and best of all…it has a 100% money back guarantee if you’re not satisfied with the plans. And you still get to keep the playhouse plans! This guarantee is identical to the one offered by the vendor of the wooden pirate ship playhouse plans.
Anyway, John White’s playhouse plans kit contains precise step-by-step instructions so they can be used as a straightforward reference guide i.e. do this and that, or put this here or put this there, but just like any other woodworking projects, modifications can be made according to your preference—or your child’s preference.
With these plans at your disposal, you’ll have access to all the directions, measurements and diagrams so you can embark on your maiden playhouse project as soon as possible, and will be guided every step of the way.
Even a complete beginner will be able to put together one of these playhouses and you’ll be armed with the proper knowledge on building each playhouse’s foundation, flooring, walls, roof and porches. These are very thorough and well thought out playhouse plans—well worth the price in my opinion.
Here is a list of playhouse plans that are available in the entire kit:
Colonial Plantation
Colonial Prairie
Comfy Cottage
Hunter Cabin
Mountain Retreat
Rancher Cabin
The Sequoia
Cozy Cottage
And finally…the really wonderful looking Tree Top Paradise Playhouse Plan.
The plans for constructing a pirate play ship which I talked about earlier are awesome—make no mistake about that. However, some of you guys out there might be more interested in building different kinds of play houses for your kids, so these plans are certainly a good alternative.
Or if your budget permits, you can get both the wooden pirate ship playhouse plans and John White’s plans. Both plans are extremely well put together so you can’t go wrong with them. Good luck on your build!
Check out John White’s Playhouse Plans Kit Here (currently unavailable)
Check out the Plans for Building a Pirate Ship Playhouse Here
Latest Update: Recommended Tools and Supplies for Building Play Houses or For Just About Any Kind of Woodworking Project
Earlier when I talked about those plans I used to make a pirate ship-style playhouse for my son, well that post was written about two and a half years ago. Back then my carpentry/woodworking skills were just plain awful.
Still, those plans helped me out in building a real beauty of a pirate ship playhouse for my son, plus two regular playhouses (yes, another one for my son) courtesy of John White’s plans. The other playhouse was actually made for my nephew as a present for his birthday.
So yeah, the kids are happy, and as for me…Well, I’m happy to say that I caught the woodworking bug real hard! A year and a half later and my carpentry skills have improved pretty significantly.
I’ve done a number of woodworking projects like a wooden squirrel feeder, a toy chest, a couple of patio chairs, a small bookcase, plus other small stuff—nothing huge. The biggest projects I did were the playhouses.
Anyway, thanks to this woodworking bug, I started buying tools and supplies to aid me in my projects. Listed below are some of the tools and supplies I’ve purchased (and borrowed).
Circular Saws
Circular saws are handy power tools that make cutting wood and other materials a lot more manageable. They are commonly used in construction or remodeling job that requires a lot of wood to be cut on site. This is because they simplify the cutting of 2x4s and other lumber. Also, they can cleanly cut large pieces of plywood without having to rely on bulky table saws.
Types of Circular Saws You Can Buy
Circular saws are typically divided into 3 different designs:
Sidewinder Circular Saws
These are typically lightweight and very easy to handle. The name comes from the layout of the motor being off to the side of the blade.
Worm Drive Circular Saws
These saws are designed to place the motor directly in line with the blade. They are typically heavier than sidewinders. Professional carpenters often prefer worm drive circular saws.
Cordless Circular Saws
These types of circular saws aren’t quite as powerful as the other types, but they make up for that with the convenience and ease of use that comes with being cordless. New battery technology that provides longer charge times has made these saws extremely popular as of late.
Important Considerations When Purchasing a Circular Saw
A professional carpenter will have different features that they prefer on a circular saw when compared to a more casual user. There certainly are saws to cater to every type of user, but there are some features that everyone should be aware of when purchasing a circular saw.
An efficient, working blade guard
Circular saws can be dangerous, and safety must be the first concern for everyone who plans to use one. Buyers should make sure that the circular saw they are considering for purchase has a blade guard that is built with safety in mind.
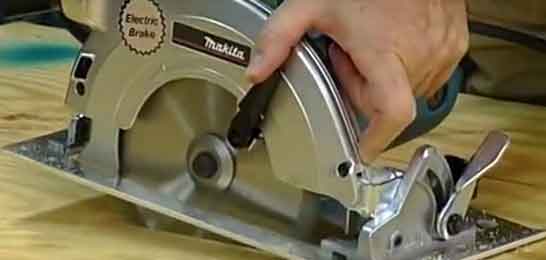
An electric brake and spindle lock
When a circular saw has to be stopped quickly, a good brake is required. This feature should be a non-negotiable when choosing a circular saw. Spindle locks are also important, as they allow the user to lock the spindle securely while changing blades.
Consider the weight of the saw
People who plan on only using their circular saws every once in a while for short, simple jobs, may be okay to choose a slightly heavier saw. For people who will be using a circular saw regularly or on big jobs, a lighter saw should be considered because they are not as burdensome as heavier saws.
An efficient, working blade guard
Circular saws can be dangerous, and safety must be the first concern for everyone who plans to use one. Buyers should make sure that the circular saw they are considering for purchase has a blade guard that is built with safety in mind.
An electric brake and spindle lock
When a circular saw has to be stopped quickly, a good brake is required. This feature should be a non-negotiable when choosing a circular saw. Spindle locks are also important, as they allow the user to lock the spindle securely while changing blades.
Consider the weight of the saw
People who plan on only using their circular saws every once in a while for short, simple jobs, may be okay to choose a slightly heavier saw. For people who will be using a circular saw regularly or on big jobs, a lighter saw should be considered because they are not as burdensome as heavier saws.
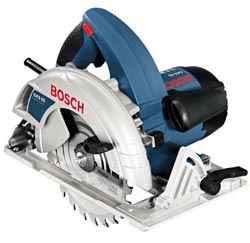
I used the Bosch GKS 65 G during the course of building the playhouses. It is well-built and reliable with plenty of power and can do most of the things you might ask of a circular saw.
Motor input: 1,600W
No load speed: 5,900rpm
Speed under load: 4,200rpm
Cut depth: 65mm at 907 48mm at 45°
Blade size: 190mm x 30mm bore
Blade type: 16 tooth TCT Rip
Weight: 5.1kg
Motor input: 1,600W
No load speed: 5,900rpm
Speed under load: 4,200rpm
Cut depth: 65mm at 907 48mm at 45°
Blade size: 190mm x 30mm bore
Blade type: 16 tooth TCT Rip
Weight: 5.1kg
Working Tips When Using a Circular Saw
1) Use a suitable means of work support such as a sawhorse or Workmate. If you cut panels, remember you will need support for the section being cut off. This could be a third sawhorse, or try clamping batten and block at the correct height as a support leg that falls away once the cut is complete, but ensure the board has a soft landing.
2) Set the blade depth to suit the material and situation. For solid timber, the full blade projection should allow maximum torque at the blade edge and help to push chippings clear of the workpiece. Use a rip blade to assist with cut speed and chip clearance.
3) When cutting manufactured board allow the teeth to just break through so half the height of each tooth is cutting through the surface. This should ensure minimal or no spelching—breakout—on the underside of veneered or melamine faced board.
Arrange cuts so any spelch on the top face can be hidden in the project construction. Use only a fine-tooth blade suitable for crosscutting or board cutting.
4) Store spare blades correctly. The easiest method is a large dowel or dowels on a wallboard that the blades can be slid onto for safe storage and easy selection.
5) For crosscutting solids or manmade board you can make up one or more MDF and softwood ‘T’ squares that are clamped on to make accurate quick cuts.
6) If you cannot get a good finish on board edges then cut slightly oversize and use a router and guide rail to do the final cleaning up.
Popular Circular Saw Manufacturers
Stil, Black & Decker, Milwaukee, and Makita are some of the top manufacturers of popular circular saw models. Each of these companies is well known for selling top-notch circular saws of all three of the major design varieties.
Casual users may be more interested in cordless or lighter weight sidewinder models, while professional builders and carpenters often opt for worm drive models, though more of the pros are starting to use cordless circular saws at work.
For tough cutting jobs and serious carpentry projects, the circular saw is an essential tool for getting the job done right.
Circular Saw Safety Tips You Must Remember
Ever since people first started using tools to make life easier, accidents have been a big concern. No matter what kind of tool you use to do a job, you have to keep safety in mind. This is especially true of power tools, like circular saws.
It’s easy to take for granted how much time a good circular saw can save you on a tough job, but you must stay safe when using it. Have a safety checklist in mind that you refer to, at least mentally, before you use your circular saw.
Here are some basic safety tips to put on your mental checklist:
Cut away from your body. Some awkward jobs are made easier by pulling the circular saw toward you instead of gently guiding it away. This kind of cutting should be avoided at all costs.
Try to rearrange the wood you are cutting to get a good angle while guiding the saw away. Serious injuries can happen when you pull the saw toward your body.
Right handed saw users should use a circular saw with the blade on the left, and left handed users should do the opposite. Part of being safe when you use a circular saw is seeing precisely where you are cutting. Keeping the blade in sight will allow you to have a more accurate, safe cut.
Don’t get trigger happy. Keep your trigger finger a good distance from the circular saw’s trigger until you are absolutely prepared to cut. Never have the blade engaged unless you are cutting.
Wear the right safety gear. Gloves and goggles should be worn any time you use a circular saw. This is basic safety knowledge that everyone knows, but many people get in a rush and forget to put on their safety gear. Ear plugs will also help to protect your hearing.
Practice safe saw storage. Never place your saw with the blade up or out to the side. Put your saw blade down on a solid surface and unplugged when not in use. Better yet, put it in a secure case to keep everyone safe.
The right tools can make any job easier to complete. Don’t be in a hurry when you use your circular saw, though. Keep safety in mind before, during and after every job. Circular saw safety starts before the job and doesn’t end until you put your circular saw away for the day.
Circular Saw Maintenance and Repair Tips
If you do a lot of work with your tools, you know that they take a lot of abuse. If you’re lucky, you won’t receive a whole lot of complaints out of them either.
What’s that? You’ve never heard your tools complain before? Well, they can, though they won’t complain with words. Instead, they’ll stop performing up to par or cease to work altogether.
Your power tools are a special breed of tools that needs some extra love and attention to stay operational. One of the most popular tools used by do it yourself repair people is the circular saw.
These handy, yet powerful tools need their own special brand of maintenance if you want to keep them working well. Here are a few regular maintenance and repair tips for your circular saw:
Keep Your Circular Saw Blade Sharp
Saws are built to cut. If you want to keep your saw running well, you need to keep the blade sharpened. This might seem like a no-brainer, but you’d be surprised by the impact regular sharpening will have on your circular saw’s performance. Not only will your saw cut better, it will also be safer to use with a blade that is nice and sharp.
Lube it up
You probably check the oil in your car regularly. Why not give your circular saw the same attention? A saw that stays lubed up is a saw that will continue to work for years and years. All machinery has to stay lube, and your circular saw is no exception.
Check the oil levels regularly and top of when necessary. Make sure to read the documentation for your saw, so you choose the right kind of oil. This is more important than you think. If you use the wrong type of oil, you could void your warranty.
Easy on that Cord
Pay attention to the condition of your saw’s cord. You probably put your circular saw’s cord through more than you think you do. Look for cuts, and mend them with electrical tape. If the cord suffers extensive damage, you may want to look into getting it replaced. Failing to keep the cord in good condition will result in loss of power and potentially deadly electrocution. Definitely not something you want to experience.
See the pros
If your saw stops working and the basic troubleshooting tips don’t fix the problem, take it to a professional repair shop. You don’t want to poke around aimlessly inside your circular saw. You could end up making the problem worse than it already is.
It’s good to stay on top of basic maintenance, but if your circular saw is having serious problems, take it to someone that fixes power tools for a living. This is your best bet to get your saw back in working condition and avoiding unnecessary problems in the future.
Power Drills
How do you know which power drill is best? That's a really good question. You could spend a lot of time reading reviews and getting expert opinions on which drill is best OR you could just take a few minutes and read what I have prepared for you here on this very page.
You see, when it comes to finding great power drills and deciding which power drill is best, I have years of experience from which to draw. So when I recommend a power drill, I'm talking from years of experience even before I started building playhouses for fun.
I’ve been using power drills for basic DIY and home improvement jobs, and I also learned a lot about them from other fellow power drill users—both homeowners who need just a small power drill for DIY fix-it jobs around the house, and seasoned professionals who really test the limits of their power tools.
Take some time to do your homework because there is nothing worse than finding out you bought the wrong power drill after you get home. Aaarrgghh! How many times have I done this very thing! So don't do what I did. Check out the information below and get the right tool for the right job.
Purpose of the Power Drill
Consider the types of jobs that you will be doing before you buy a power drill. Like I said, before you ever go out and purchase a power drill, you need to determine the main purpose or use of the tool.
If you have the expendable income and you want the best tools, that's always an option. However, if you're on a budget and you only need a smaller, less powerful power drill, then don't buy more tool than you need.
So, let's start with looking at which power drill is best for light home use. But first, you have to decide if corded or cordless power drills are right for you.
Corded or Cordless: Which Power Drill is Best?
Basically it comes down to power vs. convenience. So, once you have decided which power drill is best for your particular needs and situation, the next thing you have to determine is whether to buy a corded or cordless model.
You know how it works—if you need the serious power that can handle large drill bits over an extended period of time, then corded power drills are the way to go.
But wait, with the advances in design and power technology, some of the cordless counterparts can handle some pretty heavy loads. And if you have enough charged power or battery packs, then you can just keep going, however, if you're doing something like using a hole cutter, corded is definitely the way to go.
There are advantages and disadvantages for both types of power drills. Corded drills have more power but the cords or plugs can be damaged, even cut. Cordless drills have the advantage of convenience but may not have the necessary power.
Here, again, you have to determine what the primary use for the tool will be. This will help you decide whether a cordless or corded power drill is right for you. If you're a contractor that works on houses before they have electrical power installed, a cordless power drill may work.
What Type of Power Drill is Best for You?
Maybe you need the power of a hammer drill! Sometimes you just need the right tool for the right job. The venerable hammer drill is a tool that is designed to drill holes through concrete or other extremely hard surfaces.
When using a hammer drill, the drill actually uses a hammering motion to tap onto the drill bit as it spins in the hole. Be certain to use special hammer drill bits when doing this type of work. Regular drill bits are not designed to stand up to the punishing pressures and impacts used on a hammer drill bit.
On most of the hammer drill models, there is a switch which will allow you to use the power drill in "rotary only" and "rotary with hammer action modes." These hammer drills are useful and perform dual functions. FIrst, as a regular power drill and also as a hammer drill for masonry, brick, concrete, etc.
If you need a drill to cut through a hard substance, the hammer drill is a "must have."
Which Power Drill Has the Best Torque?
Or why torque is important in your power tool? Torque is essentially the amount of power or force that a power drill exerts on an object. One common misconception about torque is that it makes the drill run faster or more powerfully and complete work in less time. This is not necessarily true in every case.
Ok, so now we're confused. Sorry. Let me see if I can explain it a different way.
First, let's determine a few facts. Cord powered tools are almost always going to be more powerful than cordless power tools. There are some cordless power drills that pack a lot of torque, but you'll have to pay a higher price in out-of-pocket cash and battery life.
For cordless drills, the higher the voltage (9.6 to 18 and even 20 volts) and amp-hour (Ah) rating, the longer the battery life. Torque is good but too much torque can be a bad thing.
Don't get me wrong, I'm one of those guys who believe that more power and torque is always better. But if you have a high-torque power drill that you're using to drive screws—you could snap the heads right off those poor screws.
So, as I have said before, choose the right tool for the job. Typically, the chuck size will determine the torque of a power drill—the larger the chuck, the more powerful the drill. Chucks typically range in size from 1/4", 3/8", 1/2" to 9/16". Metric chucks are typically 6, 8, 10 and 13mm in size.
If you just need a power drill for working around the house, a smaller 3/8-ich (8mm) chuck will work just fine. If you're going to be drilling or cutting holes in deep wood or hard material like concrete or brick, a higher torque power drill would be a better fit.
A Bit of Power Drill History
What does the modern power drill have in common with the model-t? Did you know the origins of the power drill were first developed by the early automotive industry?
Seems that Henry Ford needed a tool that was fast, compact and portable—well, as portable and compact as it could be back then—to use in his Model-T automobile assembly plants.
He called in his tool experts, one of Ford's most trusted tool vendors. They discussed what Mr. Ford needed and designed a tool that is pretty close to what we call the power drill today. Over the last century, the power drill has evolved and added many improvements and features to make it one of the most widely used and effective tools out there.
While the original design is much like it was back in the early 1900's, we now have all sorts of different variations on that basic design. There are high-efficiency lithium powered cordless drills, powerful hammer drills and specialty drill that can power through just about any substance.
Here 's my top rated hammer power drill
DEWALT DWD525K 1/2-Inch VSR Mid-Handle Grip Hammer Drill Kit
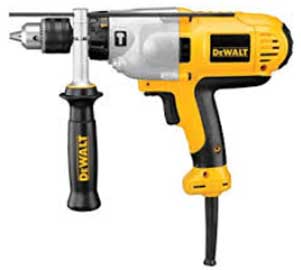
It's no secret that I love DEWALT power drills—well, OK, anything DEWALT. And I bet I'm not the only one.
This hammer drill has a powerful 10 amp motor—I don't know if there is a more powerful motor out there. In order to help people work longer, they designed a mid-mounted soft-grip handle.
DEWALT says this drill can produce 50% more power than other drills (you want to challenge that?). Special settings for high-speed and high-torque. Great drill—but then it is a DEWALT. This is one of the tools I used to build the playhouse ship with my kid.
A Final Word About Which Power Drill is Best
Stick with the name brands; spend a few extra bucks for a quality product. My granny always told me that you get what you pay for, and that has never been truer when considering which power drill is best among all the many brands out there.
As I stated earlier, just consider the primary use for your power drill, what sort of power and torque you will need, whether corded or cordless works better for your situation—and then find the power drills that fit in that criteria.
You already know that I'm a DEWALT fan, but there are a lot of other good, solid power drills out there from top-quality manufacturers like Makita, Bosch, Hitachi, Milwaukee and Skil. Stick with these brands and it's going to be hard to get into trouble.
The purpose of this page is to help you make a decision about which power drill is best for you and your particular needs. I hope it has been helpful. If it has, leave me a message*CON and let me know if this was helpful—or—how it could be even better!
DEWALT Grinders
Raymond E. Dewalt invented the very first radial arm saw in 1936, and that invention paved the way for the creation of the original DEWALT Company. Seeing the success of DEWALT, Black & Decker (now Stanley Black & Decker) bought the company in 1960 and groomed it to become one of the finest brands of power tools worldwide.
Presently, DEWALT’s product list covers almost all of every woodworker’s needs. Ask any woodworker and he’d have at least one DEWALT product among his favorite tools. Among woodworkers’ favorites are DEWALT grinders, which they have in their home and industrial workshops.
Material removal is one of the activities essential to woodworking and it can be done by using grinders. While there are different types of grinders, the type that most keep at home are the hand-held ones, which are lightest to carry and most utilized of all types.
The top three DEWALT grinders of this type are the DEWALT D28114 4-1/2-Inch/5-Inch High-Performance Angle Grinder, DEWALT D28402K 4-1/2-Inch Small Angle Grinder Kit and DEWALT D28110 4-1/2-Inch Small Angle Grinder.
All of these DEWALT grinders run at 11,000 rpm despite the differences among the amps of their motors. With their rpm, these DEWALT grinders remove material fast while being protected from overload.
Each of these DEWALT grinders also has a convenient Quick-Change Wheel Release feature, making wheel removal doable without a wrench or any other tool. Thus, you’ll no longer need to worry about losing your wrench and other tools. The keyless adjustable guards of DEWALT grinders also allow users to tune their grinders tool-free.
DEWALT grinders also carry the patented DEWALT Dust Ejection System. Dust can damage the grinders if they get into the tool. Hence, DEWALT created the system to get rid of the dust and debris particles that go into the air vents and other critical components of the grinders. This then ensures that the grinders last long.
These DEWALT grinders also reduce vibrations, something which woodworkers want to eliminate. They all have multi-position side handles. Because of this, gripping and controlling DEWALT grinders become easy and comfortable, so their users feel less vibration.
DEWALT also designed their grinders ergonomically so no matter how long people use DEWALT grinders, they will still feel comfortable with their handling. Because the DEWALT D28114 is said to have high performance, it has Complete Electronic Control. This comes with many trademarked advanced technology features which include Power-Loss Reset, Power-Off and E-Clutch.
But the DEWALT D28402K and DEWALT D28110 are still the DEWALT grinders that get top ratings. Both of them have oversized, protected spindle lock buttons, which aid their Quick-Change Wheel Release features in making wheel changes faster.
Both of the DEWALT grinders also have low profile, jam-pot gear cases. These cases ensure the accuracy of the grinders’ gear alignments. When the gears of a grinder are aligned precisely, transmission is less noisy and smoother.
These cases also let the DEWALT grinders access areas that are difficult to reach because of the tightness of the spaces grinders have to go through to get to them. Both the D28402K and D28110 DEWALT grinders also have matching wheel flanges, which make them usable with multiple accessories.

The best of the bunch of DEWALT grinders is the DEWALT D28402K, because it’s the most durable. Unlike other DEWALT grinders, it has a one-piece brush arm, which keeps it from hanging up if ever dust or debris particles enter the grinder. To accompany this component, the DEWALT D28402K also has auto-off brushes.
These automatically shut down the grinder when the brushes need to get replaced. Hence, your grinder will get protected from damage and you won’t need to worry much about its maintenance.
These automatically shut down the grinder when the brushes need to get replaced. Hence, your grinder will get protected from damage and you won’t need to worry much about its maintenance.
For Many Old-School Craftsmen and Playhouse Builders, Hand Saws Are the Ultimate Saws!
Electric power tools have generally replaced hand saws inside the toolboxes of countless craftsmen. But furniture manufacturers, particularly those who choose to minimize joinery the conventional way, could hardly get along without them.
There are numerous shapes and sizes to select from however there are just two standard forms of the traditional western saw—rip and crosscut. Japanese crosscut saws, which numerous American carpenters now utilize, are essentially diverse.
What changes in the various types of saws? Tooth style (rip or crosscut) is the number of teeth for every inch. Traditional western or Nippon design the quality of metal utilized in blade saw teeth differs for various cutting styles.
Rip saws have chisel type teeth filed directly across, vertical with respect towards the blade, and are created to cut with the grain. The crosscut saw’s teeth are typically more intricate because they're somewhat set at a specific angle, which allows them to slice through wooden fibers with minimal difficulty whenever they produce a cut.
In comparison to crosscut saws, rip saws contain larger and much less teeth, referred to as teeth per inch, and much deeper concavity (the area in between teeth). An additional element is added, the switching to the outside lean with the teeth, this creates the width of cut. Too much set creates a difficult cut; insufficient plus and the hand saw will bind.
Hand saws for ripping are available in various dimensions, each one with a variety of functions. Panel saws are definitely the biggest and have been traditionally the carpenters pillar for working big panels and wood. Nowadays, the table-saw has lessened the desire to do panel-saw function manually, but most craftsmen still discover this equipment satisfactory for smaller work.
The dovetail saw, made available using a smaller sized handle and referred to as a delicate saw, is often a smaller device compared to panel saw; it's utilized most often to trim joinery, like the pins and tails of dovetails. For hand-tool woodwork, the Tenon saw is definitely the tool of preference.
Japanese saw manufacturers use a very unique manufacturing technique. In contrast to traditional western saws, the incredibly narrow Nippon blades cut on the pull stroke.
Crosscut the teeth are likewise designed in a different way; they can be shaped into incredibly sharpened points with complicated bevel edges and angles which are a great deal more challenging to hone.
Because of this, quite a few woodworking supply houses promote Nippon saws with changeable cutting blades—as soon as the original becomes dull, it is more efficient to purchase a completely new one.
Nailers (Mostly by DEWALT)
DEWALT is a global brand known for its excellent and efficient power tools. A good number of DEWALT’s renowned products come from their nailer series. A nailer or a nail gun is a power tool designed to drive nails into wood, metal and other materials. As such, the nailer has become a more efficient substitute for traditional hammers.
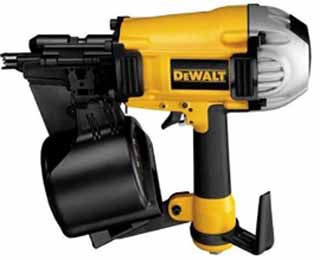
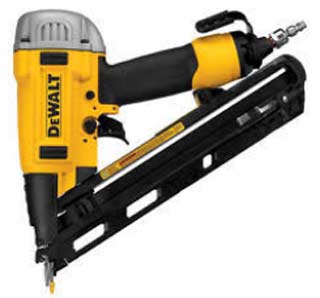
The D51855 is a coiling framing nailer with a unique engine that is designed to generate enough power to drive nails in standard framing lumber and engineered framing lumber with minimal recoil. With 20% less air consumption, and more than enough power to bury a 3 ½-inch x .131-inch nail into an engineered piece of wood.
The D51855 nailer has an accessible nail tray for easy loading, and a convenient push button for nail size adjustment. Even though these DEWALT nailers have a rather robust motor design, the piston catch enables the user to experience max power in each shot on a consistent basis.
Moreover, these DEWALT nailers feature a tool-free adjustable depth that allows quick and easy depth of drive setting. Focusing on convenience and accuracy, DEWALT have equipped this particular nailer with an overmolded rubber handle, thus giving the user a sweet balance of comfort and control for the smooth operation of the power tool.
The steel guards provide protection from any jobsite abuse, while the rafter hook assures the user of safe storage when not in use. Lastly, this nailer features a trigger lock-off which enables the trigger to be disabled after using the power tool.
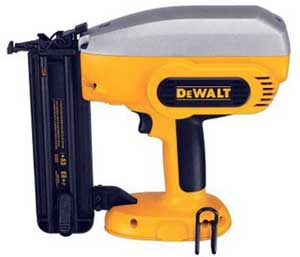
Moving on to another model found in DEWALT’s selection of nailers, the D51276K is a more compact nailer for smaller–scaled wood and metal projects. This 1-inch to 2 ½ -inch 15 Gauge finish nailer is equipped with a sealed lube dual tech. This means that the motor of this particular nailer also works as an oil-free and oil lube unit.
Moreover, it has several tool-free features like the adjustable belt hook, nail depth adjustment, jam clearing and a 360-degree exhaust. Purchasing this product entitles the customer to a free carrying case, sample finish nails and a pair of safety glasses.
These efficient DEWALT nailers feature a low-profile no-mar pad. A sequential action trigger and a trigger lock off are also installed for smoother operation. Being a lightweight power tool at 3.85 lbs., the D51276K is able to deliver around 70 to 120 PSI of operating pressure.
Another companion to the nailers mentioned above is the DC608B. Sold only as an individual power tool, these DEWALT nailers has an engine that is designed to work as fast as its end user, with effective nail penetration in soft as well as hard materials—consistently. The sequential operating mode allows a user to be more precise with his or her placement.
On the other hand, the bump-operating mode provides for more production speed. With a straight magazine, these DEWALT nailers easily accept 18 gauge nails. In addition, the nailer features easy access to the nosepiece from the safe removal of jammed nails without the use of screwdrivers or wrenches.
Perhaps an even better aspect of the DC608B is the XRP DEWALT Cordless system that it uses. Because safety is still the main concern of DEWALT, the Contact Trip Lock-Off feature of the nailer allows the tool trigger to be disabled when not in use.
With these three DEWALT nailers, a woodworker may be able to experience substantial accuracy and comfort while working on wood and metal projects. No need to go old-school with a hammer, these DEWALT nailers are designed to be helpful and efficient tools for a wide array of projects.
Woodworking Clamps
Sure Foot 3/4" Pipe Clamp
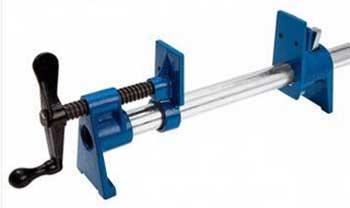
Sure Foot Plus Pipe Clamps are a great alternative to Jorgensen Pony Pipe Clamps because they don't tip over on you bench top so during panel glue-ups due to the wider foot provided. Otherwise, they are comparable to the Piny brand.
A nice thing about Sure Foot Plus pipe clamps is that they don’t include the pipe. The reason that I say this is that by making you supply the pipe (black pipe is suggested but galvanized works well) you can choose your own pipe lengths.
This enables you to have any length of pipe clamp imaginable. Since Sure Foot Plus clamps screw on and slide onto the pipe, you can simply change the pipe to change the length of the clamp. This means you don’t have to buy a clamp set for every pipe you have.
From experience, I have found that I have used 3-foot and 4-foot lengths the most. I also had some 6-foot lengths on hand. For production efficiency, I leave most of the pipes assembled and hang them on a sturdy clamp rack I made on the wall.
I also purchased slip-on plastic pads for every pipe and bar clamp to avoid marring the wood I was gluing together. You can also use wood blocks for this purpose.
The downside of pipe clamps? They are not as strong as bar clamps and may bend a bit under extreme clamping pressure, although this is unusual. If you need an absolutely flat clamp, then you may want to consider bar clamps as an alternative.
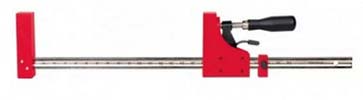
Sure Foot Aluminum Bar Clamp
These are large, clamps used for edge gluing lumber, holding casework in position during construction and similar operations on large objects. They have a wide foot design so they don't tend to tip over as easily as competitive bar clamps.
As stated above, the advantage of bar clamps, relative to pipe clamps, is that they are stronger and flatter, being based on square-tube aluminum runners rather than on black or galvanized pipe.
The disadvantage of bar clamps is that they only come in fixed lengths. If you are on a tight budget, you will be forced to consider the longer sizes because long clamps can also be used for small projects but small clamps are limited to their shorter capacities. Pipe clamps (above) are less expensive but may bend under extreme pressure.
Spring Clamps
A nice thing about Sure Foot Plus pipe clamps is that they don’t include the pipe. The reason that I say this is that by making you supply the pipe (black pipe is suggested but galvanized works well) you can choose your own pipe lengths.
This enables you to have any length of pipe clamp imaginable. Since Sure Foot Plus clamps screw on and slide onto the pipe, you can simply change the pipe to change the length of the clamp. This means you don’t have to buy a clamp set for every pipe you have.
From experience, I have found that I have used 3-foot and 4-foot lengths the most. I also had some 6-foot lengths on hand. For production efficiency, I leave most of the pipes assembled and hang them on a sturdy clamp rack I made on the wall.
I also purchased slip-on plastic pads for every pipe and bar clamp to avoid marring the wood I was gluing together. You can also use wood blocks for this purpose.
The downside of pipe clamps? They are not as strong as bar clamps and may bend a bit under extreme clamping pressure, although this is unusual. If you need an absolutely flat clamp, then you may want to consider bar clamps as an alternative.
Sure Foot Aluminum Bar Clamp
These are large, clamps used for edge gluing lumber, holding casework in position during construction and similar operations on large objects. They have a wide foot design so they don't tend to tip over as easily as competitive bar clamps.
As stated above, the advantage of bar clamps, relative to pipe clamps, is that they are stronger and flatter, being based on square-tube aluminum runners rather than on black or galvanized pipe.
The disadvantage of bar clamps is that they only come in fixed lengths. If you are on a tight budget, you will be forced to consider the longer sizes because long clamps can also be used for small projects but small clamps are limited to their shorter capacities. Pipe clamps (above) are less expensive but may bend under extreme pressure.
Spring Clamps
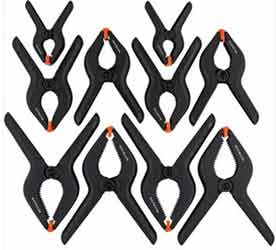
These are probably the most inexpensive type of clamp and one of the most useful. Used for clamping things together when the parts are immediately adjacent to each other, spring clamps come in many sizes and strengths. Strength of clamping pressure is not the strong suit of the spring clamp.
Positive attributes include ease and speed of on-off operation and, because spring clamps are inexpensive, the possibility of owning a lot of them and thus being able to spread the clamping pressure over a wide area.
An example of this would be found in laminating 2 or more thin strips of wood together into a long curve. One could place many spring clamps at close intervals and thus obtain even pressure all along the glue joints.
Jorgensen Model 3700 Bar Clamps
Unlike their large cousins, these small clamps are neither heavy nor cumbersome. They are designed to replace the traditional C-clamp, being lighter and yet still able to exert a considerable amount of pressure.
The uses that you will find for these clamps around the shop or jobsite are almost endless. I have used them for clamping workpieces and jigs to table tops and machine tables even more than I have used them to clamp wood pieces together for gluing.
Bessey Tg Professional Series Bar Clamps
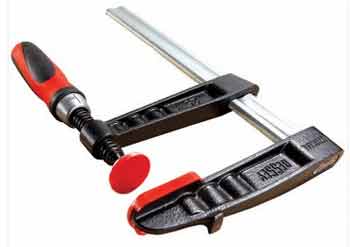
These bar clamps compare to the Jorgenson 3700 Clamps (above) in how they work but differ in that they are larger in both power and capacity. These are for bigger jobs where more pressure is required. Non-marring, glue resistant jaw pads are provided.
A set screw that is molded into the sliding arm, interlocks with serrations on the rail to prevent slippage under pressure. Acme thread means more tightening with fewer turns.
Irwin Quick-Grip Model Sl300 Clamp
This type of clamp has become extremely popular in recent years. Its use is almost identical to a C-clap or small bar clamp. The difference is speed and ease of use. The drawback is comparatively less clamping power.
Operation is simple: you simply squeeze the operating handles together to force the jaws together and release them late with t small trigger. These versatile clamps can also be used as spreaders by turning the operating head around backwards on the bar.
Jet Parallel Clamps
These clamps are a bit expensive but only because the manufacturer has had extreme accuracy as a primary goal. These clamps are used for gluing small projects, like fine boxes, together in such a way that the finished product is absolutely square.
These clamps are commonly used in sets of 4, applying equal pressure simultaneously in four directions across and along the project. Vertical spread of this pressure has also been carefully considered in the design. The jaws are 4 1/8” deep.
Specially-designed parallel clamp blocks are available hold four parallel clamps in square and vertical alignment to each other. These can be locked into position with provided bench dogs, if so desired.
Each clamp has a measurement scale embossed on its bar to allow you to see visually that you have applied equal clamping pressure on parallel clamps.
Bessey Revo K-Body Clamps
Designed for high-pressure hand clamping, these top-quality clamps apply pressure evenly across the entire area of their large jaws. Your workpieces will be protected from marring by the included, glue-repellant, replaceable jaw caps.
This clamp is designed to provide even pressure across the entire surface of your work to guard against lifting, turning and bowing during the gluing process. Each clamp includes a workpiece support that prevents contact between the workpiece and bar during gluing.
Clamp operation is via a comfortable Power-Grip handle that moves one jaw along the bar to apply clamping pressure. Extenders are available to tie two clamps together for longer length.
Bessey DuoKlamp One-Hand Clamp/Spreader
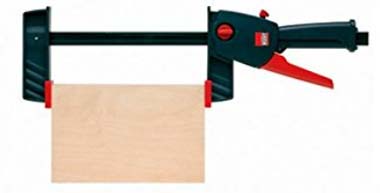
This clamp allows you to toggle between clamping and spreader modes without taking the tool apart. The large 3 1/4" throat depth means that this clamp will enjoy constant use.
A comfortable handle does the tightening and a quick-release button is located right under your thumb. Removable jaw pads can be re-configured for spreading and clamping operations.
Clamp-It Assembly Square
I have found this simple device to be a simple solution to a large problem and that problem is holding box, drawer or cabinet sides at 90 degrees to each other while they are being fastened or glued together.
I make most of my casework with large dovetails in the corners (see separate article on that subject) and although I use pipe or bar clamps to pull the dovetails tightly together while gluing, I want to also make sure that the cabinet is going to be square on all four corners.
These Clamp-it assembly squares give me that assurance. If the assembly squares show that the cabinet is not going to be square, I simply adjust the pressure on the pipe or bar clamps to correct everything before the glue dries.
Bessey Angle Clamp
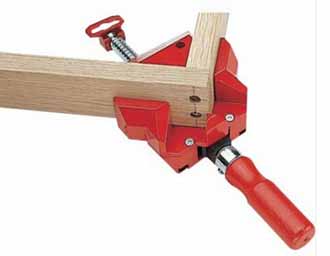
This is a specialty clamp designed solely for the purpose of holding cabinet or box corners together at perfect right angle alignment while they are being screwed or otherwise fastened together.
It is important to note that this device is NOT meant for forcing mitered corners together in a gluing operation. The next clamping device will do a far better job with that task.
Miter-Tight Picture Frame Clamp
This is the only device that I have found that actually forces picture frame miters together at the corners. There are many other devices and clamps out there that accurately hold mitered pieces together in alignment but they do not provide gluing pressure at the same time.
With this device, the corners are held at right angles to each other, even if the miters are not at the proper 45 degrees, so it is important to make sure that your miters are as close to 45 degrees as humanly possible.
Other devices that we will discuss later in this review apply pressure evenly around the entire box or frame and so, with these devices, a parallelogram, rather than a square or rectangle, is possible if the miters are not at an exact 45 degrees. In this case, the miters may look good but the project may be out of square.
Quick-Release Corner Framing Clamp
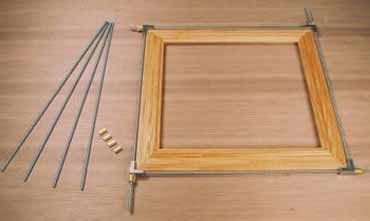
This device is elegant in its simplicity but may not always produce perfect results. This design has been around for a while. An improvement in this version is the addition of quick-release tighteners so you can remove the clamp quickly after each picture frame is glued.
The accuracy of this device depends on perfect, 45 degree miters and equal and sufficient pressure in all directions.
Clampmate Frame Clamp
This clamping device for picture frames works on a similar manner to the corner framing clamp above. The difference is that it works better and faster in its job of pulling all four corners together at the same time.
Instead of having to apply individual and probably unequal pressure at four corners, the Clampmate only requires one, central adjustment. If you have a bunch of Clampmates and have mastered getting all your miters at a perfect 45 degrees, you can get a lot of picture frames glued together in the same day.
Bessey Variable Angle Strap Clamp

Up until this point, I have assumed that you want square corners with 45 degree miters. That may be the norm but what if you want to deliberately make a parallelogram frame or perhaps a box with eight sides?
None of the devices mentioned above will help you but the Bessey Variable Angle Strap Clamp will. A strap doesn’t care if your miters are any particular number of degrees. It only cares that your miters are pulled closed.
On this strap clamp, as opposed to lesser strap clamps, you get a geared winder that cranks the strap until it is at the proper tightness. Afterwards, you simply release it and ratchet it back into the winder body. The strap measures 1” wide by 23 feet long, ample for most projects.
Quick-Set Post Handle Clamps
These inexpensive but very useful clamps are designed to hold things in place temporarily. I have used them most often in jigs for the table saw, drill press and other machines where I don’t want the workpieces to move while they are being sawed, drilled or routed.
After the operation is complete, these clamps can be released with the flick of a finger and are then ready for the next workpiece. These little wonders are made in a variety of sizes and styles.
Some of these clamps are designed to press down, some push out, some pull in. You are sure to find the style you need to make the jigs you need for production efficiency.
The final two devices are not really clamps but they USE clamps to do what they do so well. I am referring to straight edge guides that clamp onto your workpiece, allowing you to draw a line or guide a power tool exactly where you want it to go.
All-In-One Clamp Guide
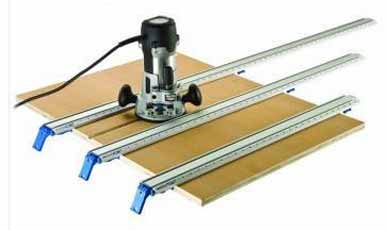
This is a zero-deflection, self-squaring straight edge that clamps across your workpiece so that you can cut, rout, mark or whatever you need to do in a straight line. Gone are the days of snapping a chalk line across a sheet of plywood and then trying to cut along a pencil line with a circular saw or jigsaw.
Simply locate the straight edge where you want the cut to be and press down on the clamping device, which will lock the straightedge to the board and simultaneously pull it into 90 degree alignment with the edges.
There is a track built into the straight edge that can be used to track tools or jigs along the device while cutting or routing. Attachments are available that connect to your tools and then run along the track.
Shop Vacuums
Cleaning up at the end of the day is not the most exciting and satisfying job in woodworking but it is necessary. Making this chore pass quickly depends on having a shop vacuum that is up to the task.
You can buy cheaper shop vacuums but they may not have enough suction or tank capacity for a woodworking shop. In recent years, woodworkers have become increasingly conscious of how dangerous airborne wood dust can be to your health.
At some point, it occurred to the people who design our tools that it might be best if wood dust never got into the air in the first place. There has been a great deal of thought and innovation applied to this problem, and many of the power tools we use today can be hooked up to a shop vacuum so that the dust is sucked away the moment it is made.
A dust mask is still advisable to protect against whatever dust does get into the shop environment as some dust always will. The more dust that is extracted at the point of origin, the cleaner the shop and the less work at the end of the day.
Some vacuums are smaller units principally designed to be attached to tools and to power on and off with them. Other shop vacuums are meant more for removing sawdust from the shop floor, workshop shelves and bench tops.
A shop vacuum is one of the best investments you can make in terms of shop cleanliness and your health. You may also want to consider investing in a motorized air filter to hang from the ceiling, but that is the subject of another review for another day.
Fein Turbo III 15-Gallon Autostart Shop Vacuum
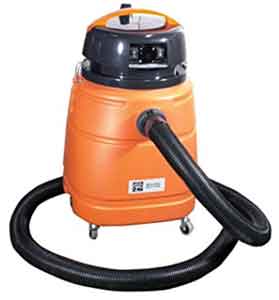
This is the largest in the series of Fein Autostart shop vacuums. The smaller models (Turbo I and Turbo II are very similar in design but have smaller tanks and slightly less suction. These shop vacuums are made to extract dust from Fein power tools so if you plan to use them with other makes of tools, make sure the hose fitting is compatible.
A rubber power tool adapter is included. All three Fein shop vacuums have a variable suction control that allows them to operate at lower power settings, as needed. These shop vacuums are made to turn on and off with the tool to which they are attached.
After the tool is shut off, the shop vacuum continues to run for a few seconds to clear the hose before shutting down. Six, not four, caster wheels are provided to help prevent tip-over while the shop vacuum is being dragged around by the hose.
Festool Ct36 E Shop Vacuum

Like Fein, Festool makes four similar shop vacuum models designed to collect dust from power tools. These shop vacuums are designed to work with Festool power tools and turn on and off with them.
They may not be compatible with other makes of tools, so check this out if you think it might present a problem for you. These shop vacuums are variable speed like the three models from Fein.
Compared side-by-side with the Fein shop vacuums, they offer a bit less suction but they are up to the job they were designed for. The CT 33 E is the largest in the line. As such, it has the most suction, the largest tank and the highest price.
The tops of these vacuums are flat with a rack designed to hold a Festool Systainer or two containing parts and/or equipment relating to the vacuum or the Festool tool attached to it. The CT 33 E has an 8.7 gallon tank and develops 134 CFM of suction with a decibel level of only 72 dBA.
Gathering Tools and Materials
When you are ready to begin construction of the pirate ship playhouse (or prototype) the first step is to set out the tools and materials you will need. Having these visible and within reach saves the nuisance of having to look for something in the middle of a process.
Make your final wood choices and cut any large pieces of wood to rough size, always allowing enough extra for the final shaping.
There is nothing more frustrating than trying to work with a piece cut too small, so provide plenty of margins. If you are going to laminate your wood, cut the individual pieces to rough size.
Once the wood has been cut, decide what glues you will need and scrutinize those on hand for freshness. If there is any question, mix up a new batch. Gluing is such an essential and integral part of woodwork that it only invites trouble to gamble with glues that have hardened, separated, or become unworkable.
Glue is the one bonding element that serves to unify certain parts of the playhouse and keep it together despite repeated use and abuse. Once the glue, glue brush, wood, and tools are on hand, then carefully review your drawing and see if it still sets well with you. Minor changes can be made as you proceed.
Laminating
If you intend to laminate your wood, now is a good time to begin this phase of playhouse making. If you have selected a glue that requires lengthy drying time, you can glue, clamp, and set the laminated piece aside. Meanwhile, work can be underway on other parts of the pirate ship playhouse while it is drying.
Before gluing, consider whether you want to stain any of the wood that is to be laminated. If so, staining before gluing is advisable. Glue is absorbed into the pores of the wood very quickly, and, if the glue is in the pores, stain will not penetrate quickly. This might cause uneven coloration.
It is important to plan the clamping in detail prior to the gluing operation. Before the glue is actually applied to the wood, place the wood in the clamp to be sure it will fit without binding. If you need to improvise your clamping procedure because the clamps you have are inadequate for a particular job, determine your needs ahead of time.
Once glue is applied to the wood you should be able to proceed quickly and confidently. When everything is ready, apply the glue, position the wood, and clamp it.
Adjust clamps occasionally, as air pockets and residual glue are forced out from beneath or in between the woods. Tight clamping will assure you of the best possible joining.
Use a sufficient amount of glue to hold the joint well, yet little enough to prevent pieces from sliding or becoming too messy when they are clamped together, forcing most of the glue out of the joint.
All residual glue should be cleaned off the wood immediately. Some glues (contact cement, mastic) become very rubbery as they begin to cure and are best left to become tacky before removing.
Sawing, Shaping, and Fitting the Pieces Together
Decide upon the best means of sawing the wood. The coping saw or its electric counterparts, the band saw or jigsaw, should be used to rough out the basic forms. Tight curves and radii are best avoided on the first pass through the blade.
Continued refinement is only possible once the more bulky forms are removed. If you are using the coping saw, place the wood in the vice and tightly secure it without marring the surface (by means of the bench stops, if your table is equipped with these).
A standard wood clamp and occasionally a metal vise can be employed to squeeze the pieces of wood together. Proceed slowly, sawing with gradual pressure, being careful not to push the blade beyond its limits.
You may need to remove the clamps to disengage the waste from the usable portion of the wood block or to rearrange the stock to give you a better angle to more accurately cut into the deeper portions.
Shaping of the wood is best accomplished by means of a rasp or file of one shape or another. This is the case with contoured wood that has many undulations or hills and valleys.
Flat wood, of course, is best leveled by means of jack plane or belt sander. Periodically, compare your burgeoning work with your drawings to keep an accurate tab as to whether it conforms to your chosen scale, form, etc.
When using the rasp, use both hands to remove unwanted peaks by allowing the tool to shave the surfaces in a gradual fashion. If abraded too abruptly, especially across the grain, the wood may splinter, leaving an undesirable groove in the surface.
Sculpting the wood by the subtractive process will give you some feeling for the natural convexities and concavities of the form. To eliminate unwanted bumps and dents, try steaming the area.
This will cause swelling, raising the surface to where bumps can be more easily ground off or left to dry, filling out the hollow portions.
Cracks or checks uncovered by sawing or shaping are to be filled with a matching wood filler or wood putty. Wood filler is composed of small particles of a particular type of wood and mixed with a paste.
The filler is forced into the crack with the finger or some other tool. The filler may have different staining properties than the solid wood and will, therefore, stain darker. If this is the case, wood bleach can lighten the filler with wax toners being applied afterwards to more closely match wood colors.
Wood fillers need not dismay the woodworker. Unforeseen fissures, checks, and splits often appear only after the wood has been sufficiently worked to make them visible.
The natural appeal of the wood far outweighs any natural flaws. The wood artist will often integrate the defect into the design visually reinforcing the wood's inherent properties.
Each material has its own special qualities,- and, while wood can often be unpredictable, it is alive, warm, and gives a sense of growth, unlike plastic, metal and synthetic materials.
The pirate ship playhouse you wish to build needs to have holes drilled in it, parts mortised, or channels cut after the forms have been blocked out, then clamp the wood so that both hands are free to work the tools best designed to shape the final touches prior to sanding.
The sanding action will further smooth the surface to bring out a deep luster for which wood is venerated.
Finishing
Begin sanding with a coarse paper, gradually working through medium and fine grades before waxing and polishing. There is a distinction between rough sanding and fine finishing, which are both accomplished with abrasive papers used on sanding blocks, grinders, disc sanders, or stationary and portable belt sanders. Coarse to fine papers are used in the beginning.
Final finishing is best done by hand rubbing with a fine powder, such as rottenstone mixed with linseed oil. Your choice of abrasives will affect the outcome of your handcrafted piece. Here are four points to keep in mind when finishing the wood:
1) Use the correct grade of sandpaper for the job. Mesh sizes range from 16 (the coarsest) to 600 (the finest).
2) Use the correct abrasive in conjunction with steel wool, sandpaper, or a rubbing cloth. Rotten- stone is similar to talc, but is coarser and is to be used for very fine polishing. Silicon carbide is the hardest of the abrasive materials and should be used for rough sanding.
3) Sand with direction of the grain. Cross-grain sanding scratches rather than polishes the wood.
4) If steel wool is used for finishing, use the 0000 grade to obtain comparatively smooth surfaces.
Playhouse Plans That You Should Definitely Avoid
Fast Start Wooden Pirate Ship Playhouse Plans by Simon Bridge

Building a pirate ship playhouse is very exciting to be honest, but not with these plans as your reference guide. Frankly, Simon Bridge’s wooden pirate ship playhouse plans suck big time! The title “Fast Start” suggests the plans will help you to quickly get started building that pirate ship playhouse. Nope, not a chance I’m afraid.
The diagrams, the drawings, the pictures—they look quite awful. I believe the author clearly does not know how to build a pirate ship playhouse that’s pleasing to the eye. The examples he presented in this plans package are just plain ugly.
The diagrams contain minimal details and the measurements are unbelievably incomplete! His instructions are just as bad. The author keeps harping on and on about types of woods that you should use to build the playhouse, but he doesn’t really explain in detail how to actually build the playhouse.
Also, he talks rather excessively about how much joy his children got from playing in the playhouse that he built with his own two hands. Okay that’s really nice and sweet dude, but can you keep that info to a minimum and focus on teaching us exactly how to put together the darn playhouse so that we can bring joy to our children as well?
Adding insult to injury, the instructions contain a rather copious amount of spelling mistakes and grammatical errors. A construction video is also included, but this entire wooden pirate ship playhouse plans package is just so diabolical, the video feels more like a cruel joke to me.
In fact, it is pretty cruel. It’s not like the video features step-by-step demonstrations on building the pirate play ship. Instead, the 10-minute video shows multiple brief segments of the author constructing the pirate ship playhouse with some cheesy royalty free music playing throughout.
Cruel indeed! I asked for a refund and got the funds back ($19.90) in my PayPal account within a couple of days. So that’s a plus point I suppose…
A Beginner’s Guide to Building a Playhouse by Bryan Koon

If you are in the mood to check out a truly dreadful playhouse building guide, I would recommend Bryan Koon’s A Beginner’s Guide to Building a Playhouse. Holy crap, what a turd this is.
You know, the pages of this guide are packed with awesome looking DIY wooden playhouses. And that’s about the only plus point this guide has offer. It is called “A Beginner’s Guide” but it doesn’t actually contain a good amount of info concerning the basics of building your own playhouse.
If the guide is targeted at newbies, then the author should have presented a number of introductory ideas in learning how to put together a playhouse such as wood selection, tools of the trade, making the proper measurements, etc.
Instead, the author goes straight to giving you the lowdown on how to build a rather complex looking wooden playhouse. The drawing of the playhouse looks good, but why in the name of everything that is pure and holy is this called “A Beginner’s Guide”? No beginner or pro for that matter, can comprehend the contents of this guide.
While the drawing of this complicated looking playhouse is respectable, the steps for building it are not well explained. The building plans, drawings, as well as construction techniques are difficult to understand.
The color photos showing some of the construction steps are also problematic because they are blurry and the angles are just weird. I think the author or the guy who helped took the photos should check out some sort of beginner’s guide to basic photography.
Also note that the complex playhouse is the only type of playhouse covered in this guide. It would have been nice if the author had included a couple more types of playhouses that look more newbie-friendly.
On second thought, perhaps the inclusion of additional playhouses isn’t necessary since like I said, the instructions, building techniques, drawings, reference photos, etc. are poor. So what’s the point, right?
It does not matter even if you know nothing at all about building a playhouse, because the way this guide is composed, I doubt you are able to glean any useful info at all. All in all, this one’s a total bust.
Simple Pirate Ship Playhouse Plans by Roy Hill

This is pretty much a poor man’s version of the pirate ship playhouse plans I covered at the beginning of this page, and I don’t fancy it at all. The playhouse building measurements are complete, and there are five different types of pirate ships for you to build.
Unfortunately this plans package is ruined by badly written instructions with extremely poor quality instructional images and drawings. The designs of the ships are not that great either. Out of the five pirate ship playhouses, only one I would consider as good. The other three are so-so, while the remaining two look downright terrible.
Still, these plans are meant for woodworking novices, so good quality photo illustrations are absolutely crucial. The lack of top-notch reference illustrations and diagrams will likely leave you asking the question, “Are you kidding me?”
Pirate Costumes to Go With That Pirate Playhouse You Just Built
Kids have played pirates long before Johnny Depp made it so popular. But it seems that Pirates of the Caribbean 5 is set to hit our screens in 2017, so I don't imagine the pirate craze will be over any time soon.

In the meantime, you've got kids and they want to be pirates—for dress-ups, for parties, for Halloween, to look the part on their newly constructed pirate ship playhouse—or they'll make you walk the plank!
Of course, you could simply cut off some old jeans and dig out an old stripey shirt, but kids these days won’t be satisfied with such a simple getup. Looks likes you may just have to dig deep into your pirate gold and go shopping for some proper kids’ pirate costumes…
As I'm sure you know, there are lots of places to buy kid's pirate costumes online. One of the biggest online costume shops is Costume Craze and I found their selection to be pretty amazing.
Their prices range of course, and so do the quality of their costumes. While you'll find hundreds of cheap costumes out there, Costume Craze has an ‘elite’ range which is worth the money. The attention to detail is extraordinary and the quality of the fabrics used is much higher, meaning the costumes will wear better and last longer.
Kid's costumes create an interesting dilemma, especially when it comes to subjects like pirates. They want to have fun dressing up, but often the costumes available for kids are scaled down versions of costumes for adults, and these are often age inappropriate.
For girls, this is a big concern. It might be loads of fun to dress your 4 year old princess up like a pirate, but take care to make sure she doesn't end up looking like a wench!
At Costume Craze you'll find a good selection of costumes that keep your kids looking like kids.
